Blog: TTTThis

Running Bryce3D in a VM on linux (linux host and guest, debian blends)

sudo dpkg --add-architecture i386
sudo apt update
sudo apt install wine wine32 winetricks -y

... BUT if you're using KALI THIS PROBABLY WON'T WORK SO INSTALL DIRECTLY WITH

sudo wget https://raw.githubusercontent.com/Winetricks/winetricks/master/src/winetricks -O /usr/local/bin/winetricks
sudo chmod +x /usr/local/bin/winetricks
sudo mkdir -p /mnt/brycecd
sudo mount -o loop /home/YOURCOMPUTERNAME/Downloads/Bryce3DCD.iso /mnt/brycecd
WINEPREFIX=~/.bryce3d WINEARCH=win32 winecfg

... Now Wine Configuration will pop up, so just click “OK”, or do this (if you click OK and want to do it, because the graphics for original Bryce computers were different), do WINEPREFIX=~/.bryce3d winecfg

...

  • Now go to Graphics tab and
  • Check the box that says "Emulate a virtual desktop".
  • Set the Desktop size to 1024x768 (or 1280x1024 if you want it slightly larger). BUT SINCE YOU ARE IN A VM, YOU MIGHT NEED 800x600 if it launches and it is too big for the screen
  • Click Apply, then click OK.
cd /mnt/brycecd
WINEPREFIX=~/.bryce3d wine SETUP.EXE

... Bryce 3D launches

... Bryce guides you through it's installation (to the virtual C drive Wine has already created). Just give it any name and serial number.

WINEPREFIX=~/.bryce3d wine ~/.bryce3d/drive_c/Program\ Files/Corel/Bryce3D/Bryce3D.exe -nosplash
TTTThis

Running Bryce3D on Windows 7

brice3d.iso (from archive) is 32 bit, so if you have Win7 64 bit it won't install. You can try to use OTVDM https://github.com/otya128/winevdm/releases (and double click the otvdmw application in the folder and open the bryce3d setup.exe, but it will probably say it must be installed from the CD, so this doesn't work. However, you still will need otvdmw.

So install WinCDemu https://wincdemu.sysprogs.org/download/ . Now r-click the Bryce3d .iso and ‘select drive letter & mount’ then just leave it as it is ‘v:’ and ‘data disc’ are fine, so click OK. Options pop up so click ‘Open folder to view files’. Now you need that otvdmw. Open the OTVDM folder again and double click otvdmw and then find the setup application file in your newly mounted virtual CD Drive (V:). It should now load Bryce3D like an application.

TTTThis

MX bookshops

Librería de Viejo "Pérgamo" is widely considered the most "serious" and intellectual shop on the street. It is run by a family of multi-generational booksellers who are deeply embedded in the city’s historical and bibliographic community.

The Expertise: The staff and owners here are known for their deep knowledge of 19th-century Mexican history and rare academic editions. They don't just know where a book is; they often know the provenance or the historical significance of the edition.

The Experience: Unlike the "warehouse" style shops, Pérgamo is meticulously curated despite the towering stacks. It is a frequent haunt for UNAM researchers and professional historians.


Librería El Hallazgo is another outlier on Donceles because its staff is almost exclusively composed of literature and history students or graduates.

The Staff: You will find that the people working here can actually discuss specific authors, movements, and historical contexts with you. They are particularly strong in philosophy and 20th-century literature.

The Inventory: Because the staff is educated, the "finds" here are better filtered. You won't have to dig through mountains of junk to find a quality historical text.

TTTThis

Libreboot on t480

Will remove spyware (networking and remote access) but leaves part of the blob.

Note, libreboot has been forked because the original people started using proprietary hardware. https://www.youtube.com/watch?v=Sg3bPvBF3bs&t=13s

Hardware

  1. A CH341A Programmer or Raspberry Pi Pico ($4 - $6 USD): To physically connect to the BIOS chip.

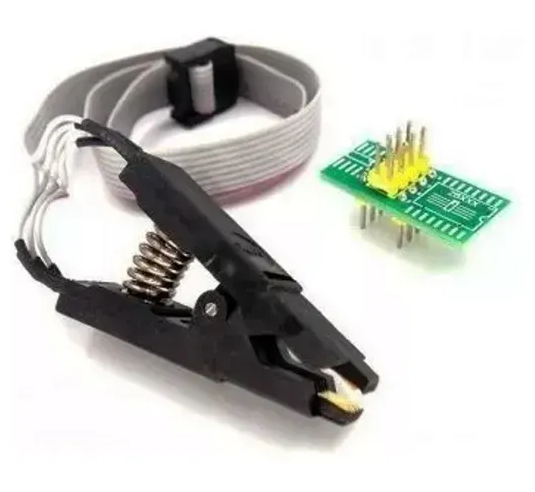
  2. SOIC-8 Clip ($12 - $18 USD): To attach to the chip without soldering (though some prefer soldering for stability).

  3. A Second Machine: To run the flashing software (your X230 is perfect for this).

Video: https://www.youtube.com/watch?v=iGKhsjvlSBQ&t=2s Got to 10:00 for connecting the clip.

Process:

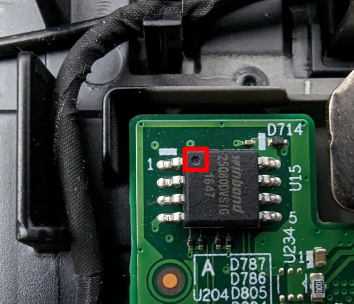
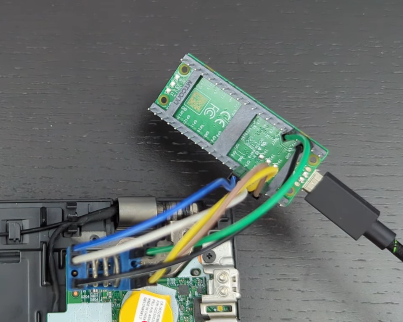
Disconnect battery and stuff, put clip (which is wired to Pico) to little Thunderbolt chip, then connect the USB cable to the 2nd computer so you can start flashing.

Image

Image

Image

Electronics District on Calle de República de El Salvador, 10:00 AM to 6:30 PM.

Specific hubs where the "serious" parts are kept:

SGE México (Aldaco 16-C): Just half a block off El Salvador. They are specialists in repair components and almost always have SOIC-8 clips and CH341A programmers in stock. Price: Around MX$95 – MX$175 (~$5.30 – $9.80 USD) for the clip itself. Can also probably buy a Pi Pico here.

LionChip México: A very reliable shop for hobbyist electronics and programmers. They often sell the "Kit" which includes the clip, the breakout board, and the ribbon cable. They also might have the Pi Pico.

Plaza del Salvador(The "Electronics Plaza"): If the individual shops are busy, enter this multi-story plaza. Walk past the consumer speakers and LED strips to the smaller stalls on the second or third floors—these are the ones that sell specialized IC test clips and EEPROM tools.

"Busco una pinza de prueba SOIC8 (o SOP8) para programar BIOS/EEPROM."

If you are trying to flash a BIOS or internal chip, make sure you get the kit that includes the adapter board (the tiny green PCB that converts the clip's ribbon cable to standard pins).

Check the Voltage: Most SOIC-8 clips on El Salvador are intended for 3.3V or 5V. If you are working with a modern low-voltage chip (1.8V), ask if they have the "Adaptador de 1.8V" as well, or you risk frying the chip.

Quality Check: Before you leave the shop, open the bag and check that the gold pins inside the jaws of the clip are straight. These clips are notoriously fragile, and a single bent pin will make it impossible to get a "read" on your chip.

If you can't get the Pico at SGE Mexico,

*"Pico para Python." * AG Electrónica (República de El Salvador 20): This is the "big" reliable professional shop. They have a massive inventory system.Price: Around MX$90 – MX$120 (~$5.00 – $6.70 USD) for the standard Pico.

TTTThis

G&S skate pants

The reason they feel "thin like pants but look like jeans" is due to three specific design elements:

  1. Material: 100% Lightweight Cotton Twill

Unlike standard denim, which is usually a heavy "12oz" or "14oz" fabric, these are made from a much lighter 6oz to 8oz cotton twill. It has the same diagonal weave as denim, but it's significantly thinner and more breathable, which is why it drapes differently—moving more like a pair of pajamas or "surf pants" than stiff jeans.

  1. The "Crackle Print" Finish

The "crackle" or "acid" print on that specific eBay listing mimics the visual texture of heavily washed denim without the actual weight and bulk of a thick indigo-dyed fabric. This was a common technique in the early 90s (around 1990–1992) to give lightweight cotton a "denim-adjacent" aesthetic.

  1. The "Beach/Surf" Construction

These are often categorized as "Beach Pants" or "Surf Pants." Key identifiers from that listing include:

Elastic Waistband + Drawstring: This is the dead giveaway. It provides the comfort of sweatpants while the faux-fly and pocket structure mimic "real" pants.

High Rise & Baggy Taper: They are cut very wide in the seat and thighs (the listing mentions the waist can expand significantly) but taper down toward the ankle. This "baggy taper" is the signature silhouette of early 90s skate gear.

TTTThis